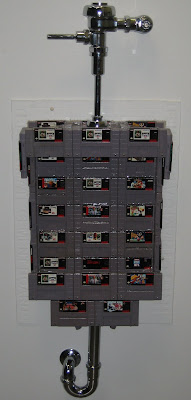
DISCLAIMER: No good games were damaged in the making of this video. All the video games used in this urinal were already broken or worthless sports games.
Building a video game urinal takes about eight hours of labor and costs roughly $200-250 (not counting the video games). If you too want a custom, hand-made video game urinal follow these steps below:
Supplies You Will Need:
Besides the video games, all of these supplies are available at most major hardware stores or plumbing supply stores. I got the video games for free from a video game store that had lots of broken or worthless SNES sports games.1 1/2 inch hole saw drill bit | Clear Polyurethane Liquid | |
How to Make a Video Game Urinal
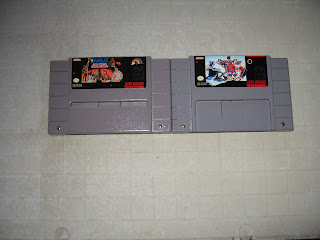
Step 1: Remove Electronics From Two CartridgesUsing the security screwdriver bit, open two of the Super Nintendo games and remove the electronics. You will only need the top piece of the cartridge with the artwork on it. Throw away the screws, circuit board, and bottom half of plastic.
Step 2: Cut a Hole in the Two SNES Cartridges
Securely fasten one of the SNES cartridge tops to a table for drilling. Using the 1 1/2 inch hole saw bit drill a hole in the middle of the cartridge. Repeat for the other cartridge using the 2 1/8 inch drill bit.
Step 3: Insert 3/4" Spud Into Cartridge
Place the 3/4 spud inside the smaller of the two holes with the threaded part of the spud on the top with the label. Using a wrench tighten the spud until the plastic part fills the hole entirely, making a water tight seal. It should look like this:
Step 4: Insert 2" Spud Into Cartridge
Place the 2" spud inside the bigger of the two holes with the threaded part of the spud on the bottom. Using a wrench tighten the spud until the plastic part fills the hole entirely, making a water tight seal. It should look like this:
Make Urinal Base and Walls
Step 5: Glue Cartridges on HardibackerSand the back of 18 cartridges so they have some scratches. Place the waterproof glue on the back of a cartridge and place the cartridge on the hardibacker. Glue three cartridges side to side. Glue another row of three cartridges above the first row. Repeat this until there are six rows of three cartridges. At the bottom glue two more cartridges in the middle. It will look like this:
Step 6: Glue the Side & Top Pieces for Urinal
The two side, one top face, and one bottom face have three cartridges each. Grab three cartridges and sand both sides on one cartridge. Sand the right side on another and the left side on another. Glue the three pieces together so there is a horizontal row of three cartridges. DO NOT GLUE THESE TO THE HARDIBACKER. It will look like this:
Repeat this step three more times until you have four pieces with three cartridges each.
Step 7: Make Row of Two Cartridges
Using the same directions as step 6 make one piece with two cartridges glued on the sides.
Step 8: Seal All Cracks
Use the clear waterproof sealant and seal all the cracks where two cartridges meet. Do this for all the pieces glued to the hardibacker, the four sets of three cartridges, and the one set of two cartridges. Use a putty knife to remove excess sealant.
Step 9: Let Everything Dry Overnight
Let the glue and sealant dry overnight so everything is solid and has fully hardened.
Step 10: Glue Side Pieces to Base
The next day, take one of the three cartridge pieces you made. Sand the bottom of the piece. Put glue along the entire bottom of the piece. Measure 2 inches from the bottom of the base and place the piece vertically. It will look like this:
Repeat this step on the other side of base so the two side walls are made.
Step 11: Make Drain Area for Urinal
Place the drain spud piece vertically in the middle of the base right above the two cartridges at the bottom. DO NOT GLUE THIS PIECE - IT IS A GUIDE. Grab two cartridges and sand the bottom of both. Put glue on the bottom of one and place it at an angle so it slants from the bottom of one sidewall and touches the edge of the drain spud piece. Repeat this on the other side so there are two slanted cartridges leading to the drain spud.
Step 12: Make Cover for P Trap
Place a cartridge below the bottom two cartridges on the base. DO NOT GLUE IT - IT IS A GUIDE. Grab two cartridges. Sand the bottom of both. Put glue on the bottom of one and place it so it is at an angle from the angled cartridges in step 11. One corner will start at the first notch on the SNES cartridge and the opposite corner will be just touch the elevated portion on the guide cartridge. Repeat on the other side as well. It will look like this:
Step 13: Make Angled Top
Place the inlet spud at the top of the base in the middle. DO NOT GLUE - THIS IS A GUIDE. Measure 1 1/2 inches from the top of the base. There should be a notch in the side of the cartridge. Mark this point with a pen. It looks like this:
Grab a cartridge and sand the bottom. Put glue on the bottom and attach it to the base so the bottom corner is at the point you marked. The opposite corner will be touching the inlet spud cartridge. Repeat these steps on the other side base. It will look like this:
Step 14: Seal All Cracks
Using the waterproof sealant seal all the cracks where two cartridges meet. Pay special attention to the cracks on the inside of the urinal because water (and urine) will flow here in the final product so the seal needs to be very good to avoid leaks.
Make Water Basin for Urinal
Step 15: Prepare Three Cartridges for Water BasinUsing the security screwdriver bit open three cartridges and remove the circuit boards inside. Keep the bottom half of the cartridge (with the warning label on the back). With a saw cut notches in the sides of the cartridges using the diagram below:
Color Definitions:
Red - Make all four cuts on one cartridge and on the other two make cuts on right side on one and cuts on left side on the other.
Green - Make these cuts on all three cartridges.
See picture in Step 16 to view final product.
Remove the plastic between the cuts using pliers.
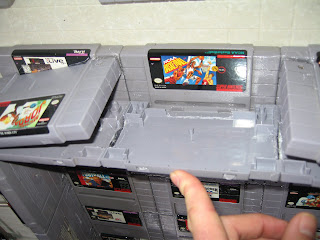
Step 16: Glue Pieces to Make Water Basin
Sand the side of the cartridges and glue them together. It should look like this:
Use the sealant to seal all the cracks between cartridges and the two holes on each cartridge where the top piece used to slot in.
Step 17: Let Everything Dry Overnight
Let the glue and sealant dry and cure overnight
Step 18: Glue Water Basin To Urinal
Grab the water basin and sand the bottom (where the green notches are in the step 15 diagram). Put glue on the bottom. DO NOT GLUE THE NOTCHES YOU CUT. Place the water basin on the urinal between the two gaps at the top. The green notches you cut will be touching the urinal base. Tilt the water basin so the part touching the urinal base is lower than the rest of the basin. This will allow water to flow down the urinal. It will look like this:
Step 19: Seal Cracks on Water Basin
This basin will fill with water during every flush so it needs to be water tight. Fill all the cracks where cartridges touch each other. DO NOT FILL THE CUT NOTCHES WITH SEALANT.
Because the water basin was tilted, there will be large cracks on both sides of the basin where it meets the sides of the urinal. Use liberal amounts of sealant to fill these cracks as well. If the cracks are too big to fill now, put sealant on one side and let it dry. Then fill the rest with more sealant later.
Step 20: Glue Water Inlet Cartridge to Urinal
Sand all four sides of the water inlet cartridge. Put glue on the small sides and side that will be touching the urinal base. Place the cartridge into the top slot on the urinal. The cartridge is heavy on one side so you will need to prop it up with supports until it dries. It will look like this:
Step 21: Glue Drain Cartridge to Urinal
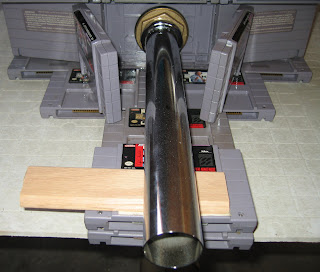
Use the extender piece with the P-Trap assembly and screw it onto the drain cartridge. Sand all four sides of the cartridge. Put glue on the two small sides and the side touching the urinal base. Place it into the open drain slot on the urinal. Use some shims or cartridges to prop up the drain pipe until it dries. It will look like this:
Step 22: Cover Water Basin and Drain Area with Cartridges
At the top of the urinal sand the top of all the water basin pieces. Put sealant in the low spots and glue on the elevated portions. Place one of the three cartridge pieces we created in step 6 over the water basin. It will look like this:
At the bottom of the urinal, sand the top of all the drain cartridges. Fill the low sections with sealant and put glue on the elevated sections. Place one of the three cartridge pieces on top so there is a drain basin. It will look like this:
Step 23: Seal All Unsealed Cracks & Spray Polyurethane
Using the clear sealant fill in all unsealed cracks. Pay particular attention to the cracks near the top water basin and the bottom drain basin. These will be holding water at times so they need to be water tight. Spray all the exposed surfaces of the urinal with the polyurethane spray to add an extra bit of water protection and give the urinal a nice sheen.
Step 24: Pour Liquid Polyurethane Into Drain Basin
Stand the urinal vertically. Pour enough liquid polyurethane into the drain basin so the sealant reaches the top of the drain. Let the polyurethane dry overnight. Water and urine will now flow into the drain. It will look like this:
YOU'RE DONE WITH THE URINAL!
Step 25: Install Your Urinal, P-Trap, and Flush Valve
I recommend calling a professional plumber to install your video game urinal. They can help you remove the excess hardibacker, adjust the height of the flush valve & P-trap so they align with your plumbing, and secure the urinal to the wall.
WARNING: Flush valves are not designed for installation in most residences. There isn't enough water pressure or water volume for them to operate correctly. You will need to install the urinal in a commercial setting or verify your water supply line meets the flush valve manufacturers specifications.
After all this time, you probably need to pee. Go ahead and try your new Super Nintendo urinal. There is something strangely satisfying about peeing on John Madden's face (in cartridge form of course).


19 comments :
Well played, well played indeed.
vercy nice!
I know you said they were all broken or sports, but I can't help cringing every time I see it. n.n;
I hate this... I love SNES!
love the concept but...that's just WRONG WRONG WRONG
If I were you, I would never travel to Japan.
'Cause some folks might feel "pissed" bout yer Concept 'n thingy.
YAY THE F-ING SPORTS CARTRIGES DIES :D btw you were featured on Hack a Day here : http://hackaday.com/2011/05/22/we-know-marios-early-years-was-a-let-down-but-this-takes-it-a-bit-too-far/
nba jam should not be in here!
it is the only sports game of all time that DIDNT suck
Eww!
Sorry, that's just wrong.
Congratulations on your build, though.
Why would you use *that color* of Liquid Polyeurethane?
@Anonymous - there isn't an NBA Jam in the urinal. That is one of the best games from my childhood. I wouldn't do that.
@Matthew - That is the only color Polyurethane that I know of. It is the "Clear" type. I wish it wasn't yellow too. I tried looking for a totally clear sealant but I couldn't find one that was liquid enough.
you should have used bull vs blazers its a shit game anyway
You are a mental case.
I challenge you to do this with super metroid, donkey kong´s , rock´n roll racing and topgear 3000 you freak!
Stupid men.
It's ugly, inelegant, and pointless considering the labels will not elicit any nostalgia. Once it's finished you are stuck with it and a hole in your pocket. This is no Macquarium or vinyl LPs hanging on the wall.
You see, the problem is that the person suggests this is justified because they are sports cartridges or "useless" cartridges. No cartridge is useless. The inside rom board and label can be removed. The resulting cartridge can be used for homebrews, flashcarts, and repairing damaged good cartridge backs. I guess I shouldn't expect this considering this ultra low-brow project.
Or, maybe he idolizes sports games, and this is the best tribute he can shake our way.
N.A.H = YALL PICTURES OF TOILETS
Now you just need an arduino with some snes sound effects while you pee/flush
You shoulda made this outta those whack “Brand New” eBay carts from China of high-end titles. That’s FREAK people out to see Zelda, Earthbound, Super Metroid, etc in there😂 Also, the N64 knockoffs woulda been smoother and easier to fill lol
Post a Comment