Showing posts with label how to. Show all posts

Friday, January 22, 2016

Guide to Shipping Video Games

Below is a guide to shipping video games. The information applies to shipping other items too but all of my examples will be for video games.

What Packaging to Use

The packaging you use is very important when shipping because it will greatly impact the cost.


Rigid DVD Mailers
rigid dvd mailer
$0.16/each on Amazon


These meet all the qualifications for "First Class Letter" and work very well protecting disc games.

I only use these when shipping cheaper disc only games because there is no tracking. For a game that sells for $5, it is better to save $2 on shipping (difference between Letter and Flat) and lose the ability to track it from door to door.

On more valuable disc only games, I upgrade to a Bubble Mailer (see below) and pay an extra $2 for the tracking.


#1 Bubble Mailers
#1 bubble mailer with measurements
$0.19/each on Amazon


These meet all the qualifications for "First Class Flat" depending on what is shipped inside.

The mailers are too thick to qualify for "Letter" rate though even with nothing inside.

A CD game in a jewel case (PS1 or Dreamcast) qualifies for "Flat".

dreamcast game inside bubble mailer


Most other games can ship inside a bubble mailer, but they will require the "Package" service due to thickness. This option is cheaper than using a box though because a box weights more and costs more to purchase.

dvd case game inside bubble mailer

genesis boxed game inside bubble mailer

SNES cartridge inside bubble mailer


Boxes
dvd case mailer
$0.42/each on Amazon


A box is my last resort for shipping. They are more expensive and heavier (increase shipping costs).

I will use boxes for shipping fragile Complete in Box games because they provide more protection. For example, NES, SNES, N64 and Sega CD boxes are very fragile. They will be damaged in a bubble mailer.

What Mail Service to Use

I always recommend shipping video games using First Class Mail International. It is cost effective, usually trackable, and arrives within 7-14 days in most instances.

There are three different First Class classifications and the costs vary a great deal depending on which you use.

First Class Letter
Dimension Requirements:
Length (Max): 11 1/2 inches
Height (Max): 6 1/8 inches
Thickness (Max): 1/4 inch
Weight (Max): 3.5 ounces

Cost: $1.20-1.70
Not trackable


Video games easily fit under the length and height maximums for letters. The problem is thickness. Only discs can qualify for the thickness requirement.

Generally speaking you will NOT ship video games as First Class Letters. The only exception is really cheap game discs which it sometimes makes sense to ship in a hard cardboard sleeve to save on postage.


First Class Flat/Large Envelope
Dimension Requirements:
Length (Max): 15 inches
Height (Max): 12 inches
Thickness (Max): 3/4 inch
Weight (Max): 4 lbs

Cost: $2.30-$19
Trackable

first class flat canada


Again, thickness will be the limiting dimension for Large Envelope service. 3/4 inch is still pretty thin.

Some video games will qualify as Large Envelopes if packaged correctly. Disc games with jewel cases (PS1, Dreamcast) and portable games without cases (Gameboy, Nintendo DS, PSP, etc).

Because it is trackable and cheaper than package service, use this method for any item that qualifies as a Large Envelope.


First Class Package
Dimension Requirements:
Length (Max): 24 inches
Length + Height + Width (Max): 36 inches Weight (Max): 4 lbs

Cost: $9.50-36.50
Trackable

first class package canada


If the game can't ship as a letter or large envelope, it is a package.

Games that ship as packages include disc games with DVD cases (Gamecube, PS2, Xbox, PS4, 360, etc), thick cartridges (N64, SNES, Genesis), and anything else with a box.

Most video games will have to be shipped as First Class Packages. It is trackable but more expensive.


Media Mail
Do not ship video games or video game hardware with media mail. It does not qualify. Your package will be refused or additional postage will be added on.

Customs Forms for Canada

Shipments going to Canada will need a customs form filled out.

Packages under 4 lbs use form CN22.

Packages above 4 lbs require a longer form, 2976-B, which is in quadruplicate.

Below is an example of the CN22 form filled out for a video game.

CN22 Example Filled Out


The USPS let's you fill out the CN22 online or you can fill it out at the post office.


Save Money with Large Volume Shipping Providers

If you ship lots of international packages (5 pound per day minimum) you can use shipping services like UPS Mail Innovations and DHL Globalmail and save a bunch of money on First Class Packages.

These providers will pickup the packages from you, sort them, process them until they reach the border and then hand them off to Canada Post (or other country post office) to handle the rest of the delivery.

The savings can be substantial and the more you ship the bigger the discounts.

Here's an example based upon actual costs per item for a seller shipping 30+ pounds per day:

Weight USPS First Class Mail Innovations
1 oz $9.50 $3.10
5 oz $9.50 $4.26
10 oz $15.00 $5.71


As you can see, the savings are pretty big and the packages are trackable from door-to-door.


Once you get used to shipping to Canada, it is very straight forward. It can be expensive but buyers on our marketplace cover all the shipping costs.

If you have any questions about shipping games to Canada, please let me know in the comments below.

Monday, January 11, 2016

Guide to All Game Cartridge Screwdriver Bits, Batteries, and Circuit Boards

Author: Zachary Latour

As collectors continue to buy games for their collections, they will eventually have all of the common stuff that they want. Then it's time to find the rarer, and thus more expensive, stuff. If you are going to buy more expensive games, you need to be sure that what you’re getting isn’t fake.

The circuit board and inside of the cartridge is the most definitive way to tell if the game is legitimate or fake.

The Tools Every Game Collector Needs

The first thing I want to talk about is getting yourself the correct tools for game collecting. In order to open most of the games that you are going to find, you’re going to need some different screwdrivers: 3.8mm security bit, 4.5mm security bit, tri-wing head, small Philips head, and a small flat head screwdriver. These will allow you to open almost any old video game cartridge, console, or controller that you’ll run into. All of the tools I use to are shown in the picture below.


All of these screwdrivers can be bought online for under $9 (3.8mm and 4.5mm set, Triwing, Precision Screwdriver Set).

There are videos online on how to make your own security bit screwdrivers at home, but I don’t recommend doing so. Instead, if you’re serious about collecting, just pay the couple dollars and get a set of screwdrivers that will last you forever, if you use them correctly.

Tools, Batteries, & Circuit Boards for Every Cartridge Video Game

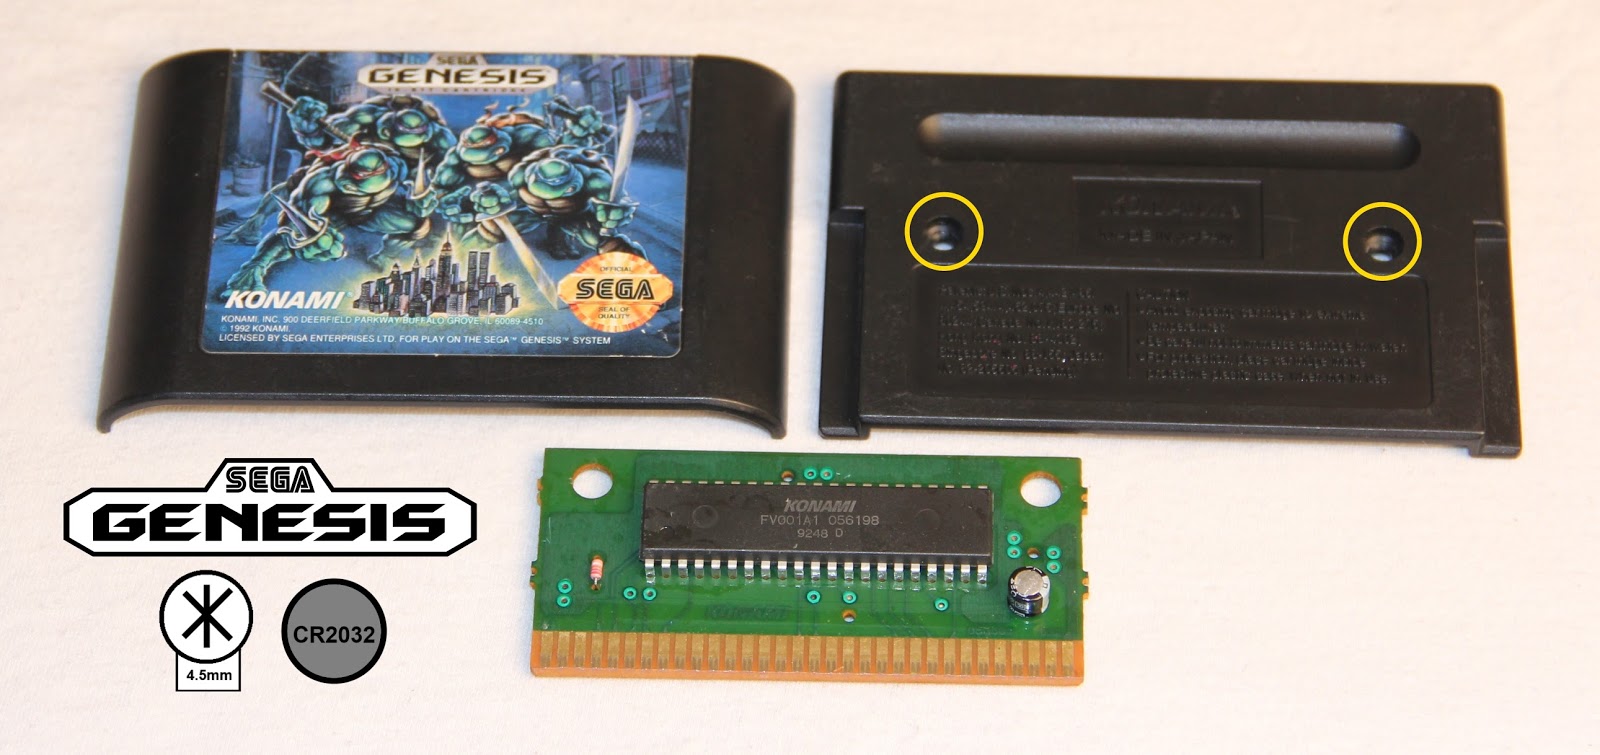
The pictures below display many different types of opened video game cartridges. They show:

  • Type of cartridge
  • Which screwdriver opens the cart
  • Locations of the screws
  • Printed circuit board (PCB)
  • Save battery the cartridge uses


Please note that some games have batteries and some do not. Also, note that some games have different chip numbers that are still legitimate PCBs. I live in North America so this reference picture reflects North American (NTSC) games.

NES Cartridge (Type A)


NES Cartridge (Type B)


NES Cartridge (5 Screw)


Super Nintendo Cartridge


Nintendo 64 Cartridge


Gameboy Cartridge


Gameboy Color Cartridge


Gameboy Advance Cartridge


Virtual Boy Cartridge


Sega Genesis Cartridge


Sega 32X Cartridge


Sega Game Gear Cartridge


Sega Master System Cartridge


Vectrex Cartridge


Every collector should get comfortable opening game cartridges. Opening games will allow you to not only verify legitimacy, but it will also allow you to clean up your games. You can change dead batteries, completely clean game boards, remove loose pieces bouncing around inside of the cartridge, and swap out backs of games to make games look better. Doing any of the above practices can only make your game collection more reliable, better looking, and more enjoyable.

What to Look for on The Circuit Board


Look for any soldered wires on the PCB. Official boards do not use wires to bridge different parts of the chips on them. This is an immediate indication of a hack job and a pirated game. The game might look official from the outside, but as soon as you disassemble it you will immediately notice that it’s a fake.

Look for stamps on the PCBs. Brand names like ‘Nintendo’ or ‘Sega’ printed directly onto the board will always help with confirming authenticity. This is not 100% though, as some bootlegs now have the company stamp on the boards.

If you buy a rare or expensive game online be cautious. There are scams selling fake games that many collectors have fallen for. If someone sends you pictures of the board before you meet up with them always double check it in person. Take the cart apart and look at it for yourself before handing over any money. There is nothing stopping the seller from sending you pictures of a legit board and then switching it out with a common game, a pirated PCB, a blank PCB, or even a broken PCB for the actual transaction. There are good deals to be had online, but keep in mind that sometimes it might be too good to be true.

Reproduction Labels on Cartridges

Some games will have reproduction labels. A collector might have replaced a damaged label with a new one. This is not fraudulent. Usually it is done to improve the appearance of a game. Reproduction labels can be a sign of a bootlegged game too. Be more cautious of games with bootlegged labels.

Most reputable reproduction label manufacturers will have ‘REPRODUCTION’ written somewhere on the label. I know that sounds like an IT guy asking you if your computer is plugged in when it won’t turn on, but most people bootlegging games don’t even notice any details on the label. Below are pictures of some reproduction labels.


Monday, June 15, 2015

How to Spot a Fake (Pirated) Gameboy Advance Cartridge

Author: Zachary Latour

The Gameboy Advance (GBA) comes from the sixth generation of game consoles, and is home to around a thousand games in North America and many more in other regions around the world.

Sometime during the handheld’s life span, fake games also known as pirated carts or bootleg carts, slid their way into the market; now, years later they are knowingly or unknowingly in game stores, pawnshops, on auction sites, and even worse… in our collections.

You might be asking "What’s so wrong with having a bootleg game in your collection?" In the grand scheme of things I guess it doesn’t really matter. It’s not like your game collection is going to burst into flames because there’s a pirated cartridge among the masses of legitimate games, but the problem is that the games probably got to where they are right now without any knowledge of the cart being a fake. Wouldn’t it be nice to know which game is fake and which is real?

The biggest problem with these carts is that they are fake and deliberately being passed off as genuine. It’s not like pirated game carts have a bright orange casing with the word "Bootleg" engraved on the back, instead, these games are purposely made to look as close to the original as the company is able to make them so that gamers and collectors don’t notice a difference.

Bootleg GBA games are usually sold by stores or auction sites not knowing that what they are selling is fake. Since they believe it to be real they will sell it for the same price as a legitimate cartridge. I’ve run into fakes in many stores; sometimes I’ve informed the worker and they either didn’t believe me or didn’t care.

Another problem with pirated carts is the lower quality. We all hate when our NES and SNES batteries die and all of our saves get erased? Well, there are very few official GBA games that actually use a save battery, instead most use a memory chip of varying types to save the data. Bootleg GBA carts use save batteries. With a fake Gameboy Advance game, your batteries will eventually die whereas if you had a legitimate copy your saves stay until you decide you want to start the game over again.

5 Ways to Spot Fake Gameboy Advance Cartridges

Now that we know these games are out in the wild for us to waste our hard earned money on, and possibly in our own collection, let’s look at five different ways to tell the fakes from the real thing.

GBA Fake Method 1

First, the most common way to spot a fake. The ‘NINTENDO’ stamp on the circuit board directly above the pins on the cart is a great first step. This mark can actually be seen just by looking into the cart from the bottom. (I’ve disassembled the cart and underlined the stamp in yellow to make the stamp clearly visible.) Also, while we are on this picture take a second to notice the save battery in the fake cart vs. the memory chip in the real cart. (The save battery is circled in yellow.)


GBA Fake Method 2

Second, let’s flip the cart over and inspect the ‘NINTENDO’ logo on the back of it. What we have here is the same type of idea for both logos but the two look noticeably different. (For reference, the official Nintendo logo is in the top left hand corner of the picture.)


GBA Fake Method 3

Thirdly, on the front of the cartridge we have the ‘GAMEBOY ADVANCE’ logo at the top of the cart. Just like on the back of the game we have same type of idea for both logos, but again the two look noticeably different. (For reference, the official Gameboy Advance logo is in the top left hand corner of the picture.)


GBA Fake Method 4

Next, one other way to tell if a cart is fake is by using an individual GBA game case. The dimensions of bootleg GBA games are usually slightly different from legitimate GBA games. An official GBA game will fit nicely in this game case and come out easily, but since bootleg GBA carts are a hair bigger they will be harder to get in and out of the case.


GBA Fake Method 5

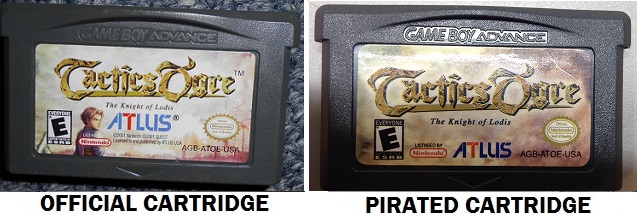
Lastly, the label artwork on bootleg GBA games are slightly different from their legitimate game counterpart. If you’re questioning the authenticity of label artwork you can always search for a picture of the cart on the internet. After searching, if there is a difference in label art between the picture and the cartridge in front of you then one of the two is fake. (This idea does not include double pack variants, best seller/greatest hits variants, or other official label variants) Remember, Misspellings on the label or cartridge, or poor printing on the label are dead giveaways that you are looking at a fake cart.


Pirated Gameboy Advance games are floating around everywhere these days so use this new knowledge to not get ripped off and to make sure you’re only buying official GBA cartridges. Take a minute to go through your own collection and weed out any fake carts that have snuck their way into it. Being able to spot a fake cart is only going to help you on your way to collection perfection, and maybe you can even impress a few people on the way.

Thursday, March 8, 2012

How to Clean Video Games & Consoles with Household Products

Author: Smsoko1988

Below are some quick tips on how to clean your video games and game systems using household products. The most common problems like dirty contacts, stickers, and markers are covered. Most of this info pertains to older cartridge based consoles but will work on newer consoles in some instances.

Warning: While cleaning the inside of a game system with a liquid solution, ALWAYS UNPLUG THE CONSOLE first to avoid electrical hazards. Also make sure the electronics are completely dry before powering the system back on.

How to Cleaning Game Cartridges

Supplies Needed:
For cartridge based consoles it is highly recommended to clean your games and the system (Mainly the cartridge slot) before playing games on it. I say this because some games or cartridge slots may be really dirty and the last thing you want to do is insert a dirty game into a clean cartridge slot or the other way around.

It is very common for people to simply blow on cartridge based games to clean them. This is a simple solution but not a perfect fix. I would recommend using a Q-Tip and original Windex, yes Windex not rubbing alcohol. Believe me it works much better to clean games.

I usually have a small jar I put Windex in and dunk the Q-Tip in to soak the end with Windex. You will want to then place the wet end of the Q-Tip on the contacts of the game cartridge and run it across the board a few times on both sides of the board. You may see the tip of the Q-Tip turning black from the dust it has collected, even if you did the old blowing into the cartridge technique you will be surprised how much more dust and grime is still left on the board. When done using the wet side of the Q-Tip you will now want to use the dry side of it to dry the area you just cleaned.

How to Clean Cartridge Slots

Supplies Needed:
Cleaning cartridge slots in the game system is a little different. Usually I like to take a credit card and wrap it in a thin felt cloth and spray it with Windex. Do not completely soak the cloth just dampen it. Simply take your dampened cloth with card and slide it into the cartridge slot moving the card up and down through the slot. To dry it you can simply blow on it or you can use a can of compressed air. Windex is designed to dry quickly without having to wipe it off. So not much to worry about if you just dampen the cloth it should dry without a problem.

How to Remove Stickers from Games

Supplies Needed:
Removing those pesky stickers can be a little annoying and involves a little patience. It is recommended to slowly peel the sticker off, but we all know chances are the sticker will just tear and you will be stuck with a white torn sticker left on your game or sticker residue. Only if you’re lucky will the sticker simply come off with no problem. The longer a sticker is on the product the harder it is to remove.

If the simple tear method doesn't remove the entire sticker try this.

Use either high content rubbing alcohol (Usually 90% or higher) or Goo Gone. Whichever you may have at hand. Take your product and apply a generous amount to a paper towel and soak the sticker. You may also slowly pour the chemical directly from the bottle onto the sticker but be careful for spills. Let the product sit for approximately 30-60 seconds, rubbing alcohol dries very quickly compared to Goo Gone so keep that in mind.

After the chemical is applied you may just want to scratch away at the sticker with your fingernail until the sticker is removed. Sometimes you may need to apply more chemical and repeat these steps until the sticker is removed completely.

You can also use a razor blade and scrape the sticker off instead of scratching with your fingernail, but the razor may cut the product you are cleaning if not positioned right, so be careful and patient if you try that. For any leftover sticker residue after the sticker has been removed I recommend using a rubbing alcohol soaked paper towel or even hot water soaked paper towel and wiping the area clean. Then simply dry it off with a paper towel. Now you should be sticker free!

These tips are for stickers stuck on game cases, game cartridges, or consoles. If you have a sticker on a paper game cover art or manual I cannot recommend using these techniques as they will damage your product. Also this only works on paper based stickers. Some stickers may be metal based "Non-removable" rental stickers. There are ways to remove rental stickers but that is a completely different method and may damage your product.

How to Remove Permanent Marker from Games & Consoles

Supplies Needed:
So you just got a game or system with someone's name or initials. What do you do? Well truth be told permanent marker really isn't permanent and can be removed using two easy techniques.

Technique 1 involves hairspray. I prefer hairspray in an aerosol can as it seems to work better. Simply spray the area with hairspray and let it sit 5-10 seconds. You should see the ink start to bleed off quickly. Now wipe the area vigorously with a dry paper towel. Most if not all the ink should be gone. If some ink remains simply repeat the above steps.

A few things I want to address about hairspray are that it does not leave a sticky feeling at all to the applied surface. Hairspray is designed to be absorbed in the hair and then cure after being absorbed. Hairspray cannot be absorbed in plastics and metals. If stickiness is of a concern to you it is possible to wipe the area clean with a paper towel soaked in water and wipe dry afterwards. This method works great for areas like LCD screens or any area where light pressure is needed to remove ink from a product. Since the hairspray does most of the work for you.

Technique 2 involves using a Mr. Clean Magic Eraser soaked in water. Simply soak the magic eraser in water and start scrubbing away at the permanent marker ink. With a little patience and elbow grease the marker will come right off.

How to Clean & Restore Corroded Electronics

Supplies Needed:
Corrosion can appear as a light blue or white gunked up substance on game cartridge boards or system cartridge slots and electrical connectors. Corrosion and rust are completely different types of degrading on metals. Corrosion is usually formed by two dissimilar metals. There are several other ways it can be formed, but you're not here for a chemistry lesson you want to learn how to clean the corrosion off.

To clean corrosion off you simply need baking soda and hot water from your faucet, that’s it. I would suggest one cup of hot water then about 2 tablespoons of baking soda. Mix the two together with a spoon. Now you have a safe corrosion cleaning chemical. Depending on what you are using it on makes a difference how you apply it. If it is a cartridge slot on a game system than you may want to just apply it to a felt cloth and wrap the cloth around a credit card (Make sure the cloth is damp you and not soaked. You may need to lightly squeeze the cloth to release some liquid), then proceed to move the card up and down in the slot to clean the area.

For game cartridge contacts you can simply dunk a Q-Tip in the solution and use it in a similar way you would to clean games with Windex. I would allow the solution to sit for a few minutes before you dry the area. When done dry the area with compressed air or a dry Q-Tip. You can also use a Scotch Brite pad dampened in this solution to clean electronics if you can access areas with it. Corrosion rarely forms on electronics, so only use this guide if corrosion is present.

How to Clean CD or DVD Discs

Supplies Needed:
If a disc you have has scratches or scuffing you may want to seek out a place in your area to correct these problems and resurface the discs. Most places only charge a few dollars to resurface discs. I would not recommend using cheap cleaning kits to clean a disc as most people have reported that it may make your disc worse. I have experienced this first hand with Disc Doctor as the machine left many scuffs on my disc.

For discs some problems may be from simple finger smudges present on the surface. For a light cleaning of the disc use a dry felt cloth and rub the surface of the disc from the inner ring outward. Do not rub the disc in a circular motion as it will go against the 'grain' of the disc. No chemicals needed here.

How to Clean Console Casings

Supplies Needed:
So you have a game system and its collecting dust and you want to let it shine like new again. Or maybe you have a console or controller that has buttons that may stick and may not rebound all the way back or get stuck. Cleaning consoles goes a long way for looks but also in the consoles functionality.

If you want to properly clean the entire shell of the system you can simply remove the screws and the electronics connected to the case. I really would only do this with systems that have ridges in their molding such as an Atari 2600 or Sega Genesis systems. Cleaning those grooves can be a pain without taking the system apart.

Don't be afraid to take the old school game systems apart they are literally just a couple of screws and the motherboards come out easily. You can take the bare casings of the system and wash them in a sink with soapy water and a sponge. Dry it off and put back together. This method also works to clean jammed buttons that are filled with grime and food crumbs that get stuck in the buttons from kids using the system/controller.

A Swiffer duster and a can of compressed air are great products to invest in. No need to rip the console apart to use those. Keeping your consoles free of dust helps them breathe better keeping them less prone to getting clogged with dust, which can overheat the system. I've seen modern systems fail due to overheating from being covered knuckle deep in dust.

I'm always interested hearing new technics and what methods you use to clean games and consoles. Feel free to leave a comment with your cleaning technics below.

This is part of our video game collecting 101 series.

ShareThis


Login | Create Account